Connecting Tableau to ClickHouse
ClickHouse offers an official Tableau Connector, featured on the Tableau Exchange. The connector is based on ClickHouse's advanced JDBC driver.
With this connector, Tableau integrates ClickHouse databases and tables as data sources. To enable this functionality, follow the setup guide bellow.
Setup Required Prior Usage
-
Gather your connection details
To connect to ClickHouse with HTTP(S) you need this information:
-
The HOST and PORT: typically, the port is 8443 when using TLS or 8123 when not using TLS.
-
The DATABASE NAME: out of the box, there is a database named
default, use the name of the database that you want to connect to. -
The USERNAME and PASSWORD: out of the box, the username is
default. Use the username appropriate for your use case.
The details for your ClickHouse Cloud service are available in the ClickHouse Cloud console. Select the service that you will connect to and click Connect:
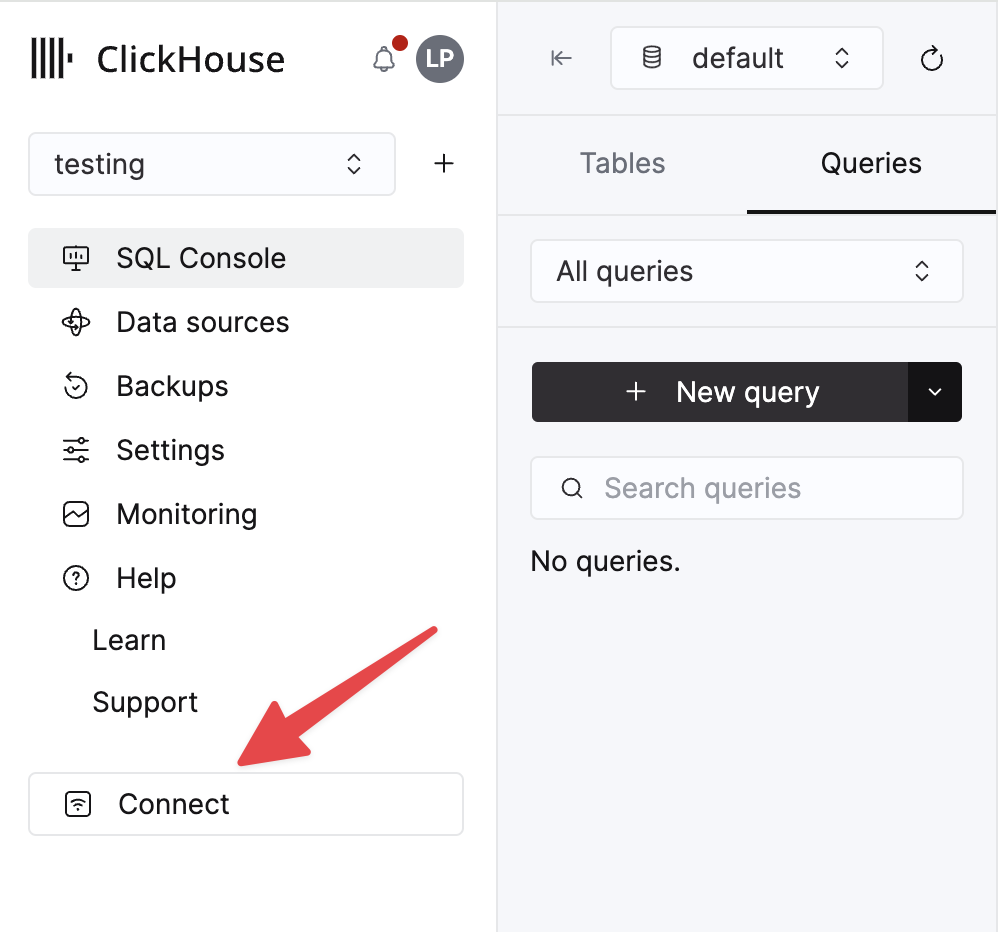
Choose HTTPS, and the details are available in an example
curlcommand.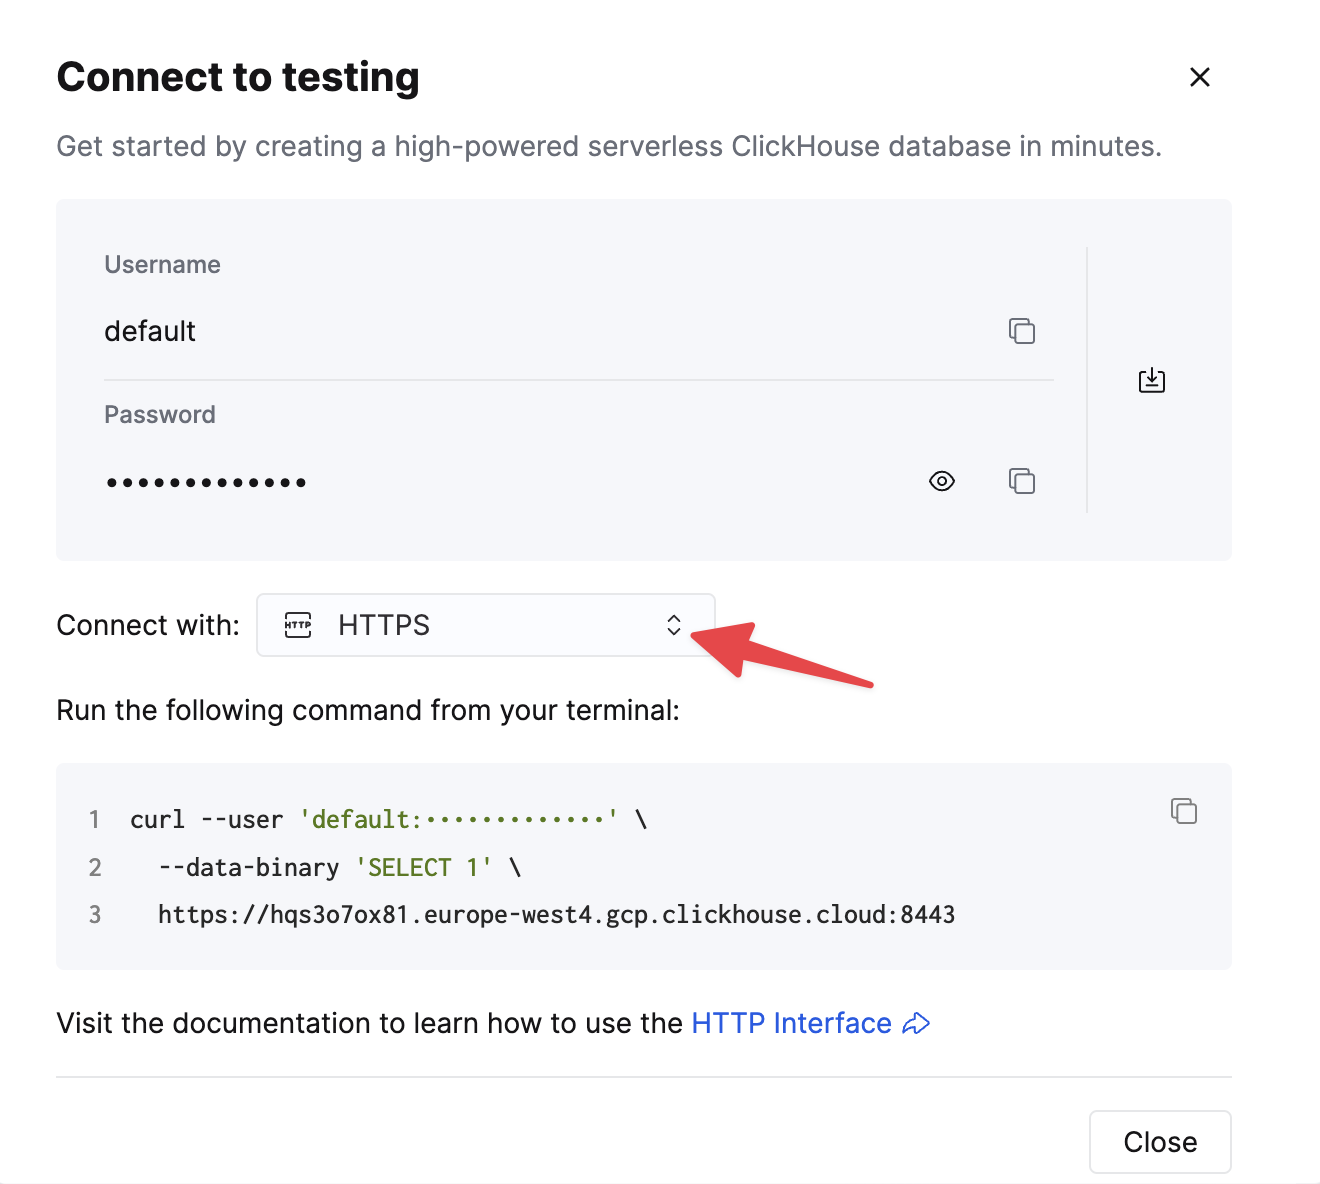
If you are using self-managed ClickHouse, the connection details are set by your ClickHouse administrator.
-
-
Download and install Tableau desktop.
-
Follow
clickhouse-tableau-connector-jdbcinstructions to download the compatible version of ClickHouse JDBC driver.
Make sure you download the clickhouse-jdbc-x.x.x-shaded.jar JAR file. Currently, we recommended using version 0.4.6.
- Store the JDBC driver in the following folder (based on your OS, if the folder doesn't exist you can create it):
- macOS:
~/Library/Tableau/Drivers - Windows:
C:\Program Files\Tableau\Drivers
- macOS:
- Configure a ClickHouse data source in Tableau and start building data visualizations!
Configure a ClickHouse data source in Tableau
Now that you have the clickhouse-jdbc driver installed and set, let's see how to define a data
source in Tableau that connects to the TPCD database in ClickHouse.
-
Start Tableau. (If you already had it running, then restart it.)
-
From the left-side menu, click on More under the To a Server section. Search for ClickHouse by ClickHouse in the available connectors list:
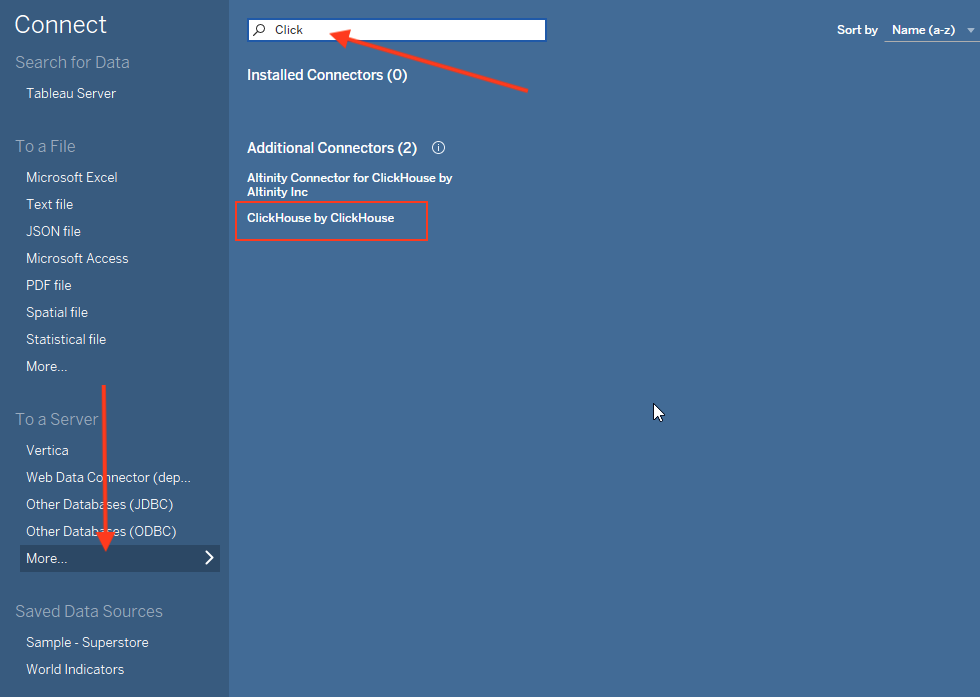
Don't see the ClickHouse by ClickHouse connector in your connectors list? It might be related to an old Tableau Desktop version. To solve that, consider upgrading your Tableau Desktop application, or install the connector manually.
-
Click on ClickHouse by ClickHouse and the following dialog will pop up:
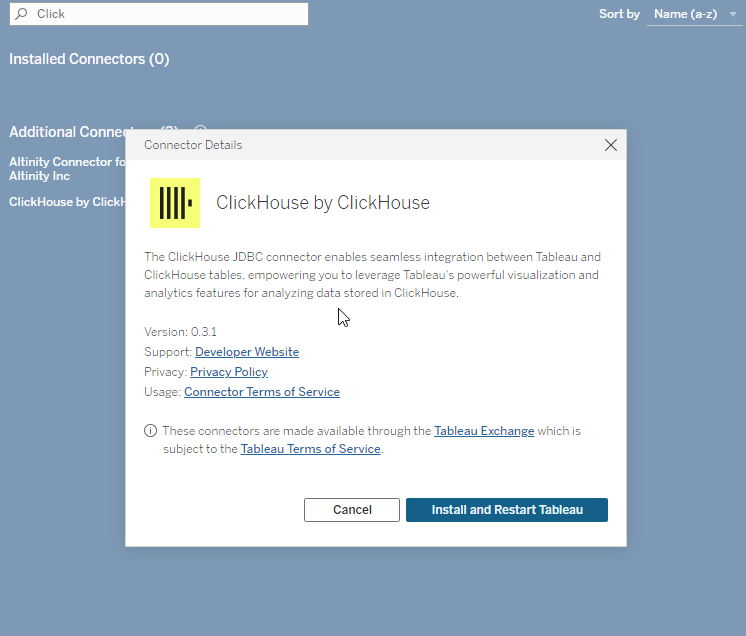
-
Click Install and Restart Tableau. Restart the application.
-
After restarting, the connector will have its full name:
ClickHouse JDBC by ClickHouse, Inc.. When clicking it the following dialog will pop up: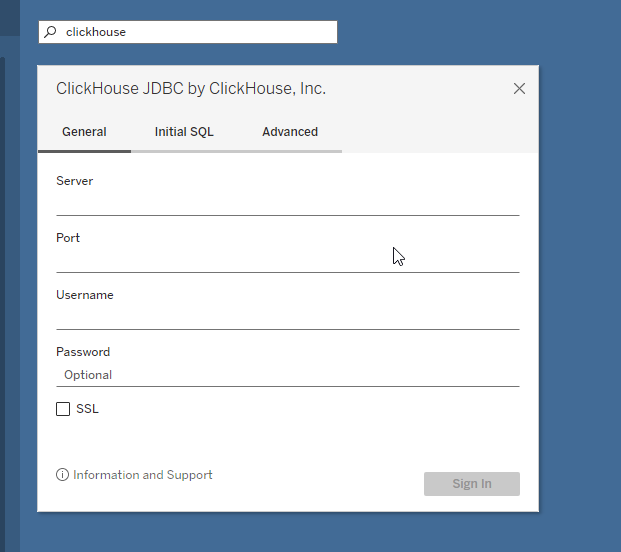
-
Enter your connection details:
Setting Value Server Your ClickHouse host (with no prefixes or suffix) Port 8443 Database default Username default Password ****
When working with ClickHouse cloud, it's required to enable the SSL checkbox for secured connections.
Our ClickHouse database is named TPCD, but you must set the Database to default in the dialog above, then select TPCD for the Schema in the next step. (This is likely due to a bug in the connector, so this behavior could change, but for now you must use default as the database.)
-
Click the Sign In button and you should see a new Tableau workbook:
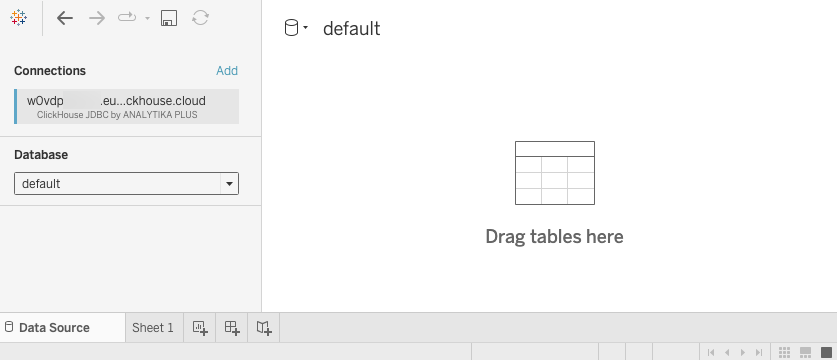
-
Select TPCD from the Schema dropdown and you should see the list of tables in TPCD:
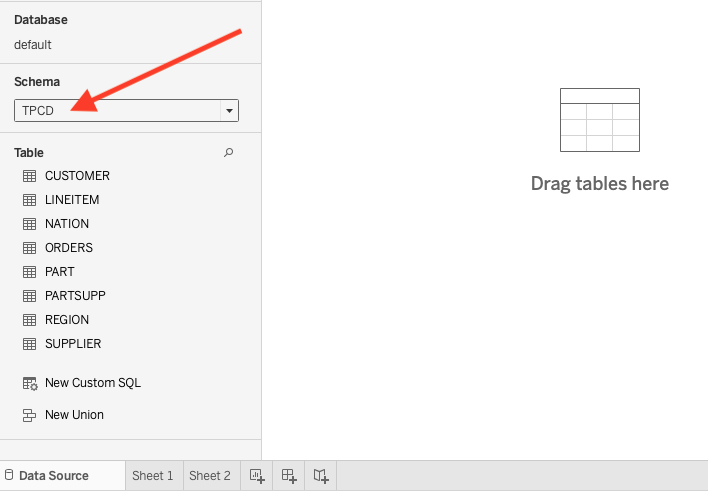
You are now ready to build some visualizations in Tableau!
Building Visualizations in Tableau
Now that have a ClickHouse data source configured in Tableau, let's visualize the data...
-
Drag the CUSTOMER table onto the workbook. Notice the columns appear, but the data table is empty:
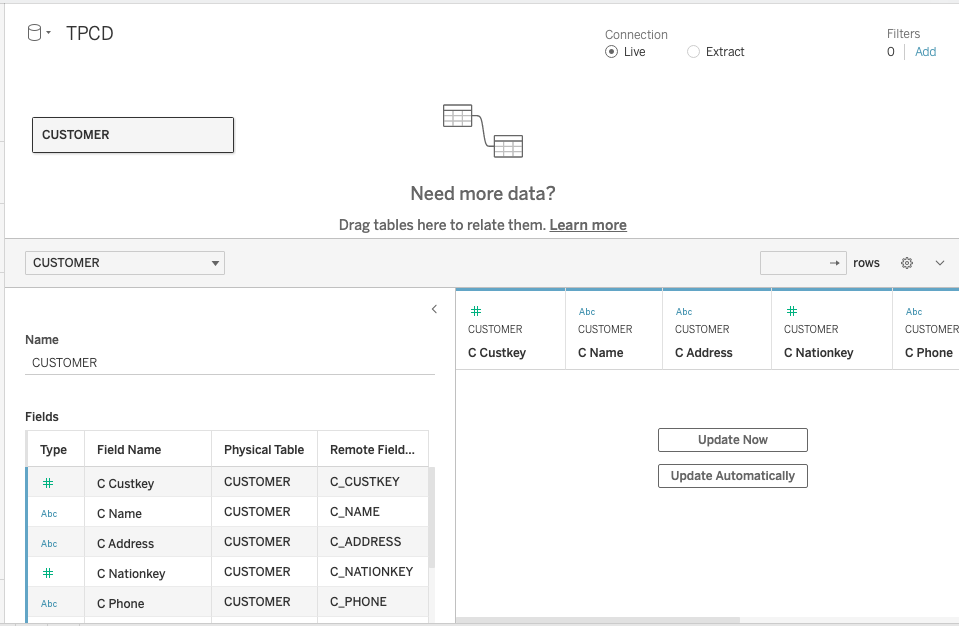
-
Click the Update Now button and 100 rows from CUSTOMER will populate the table.
-
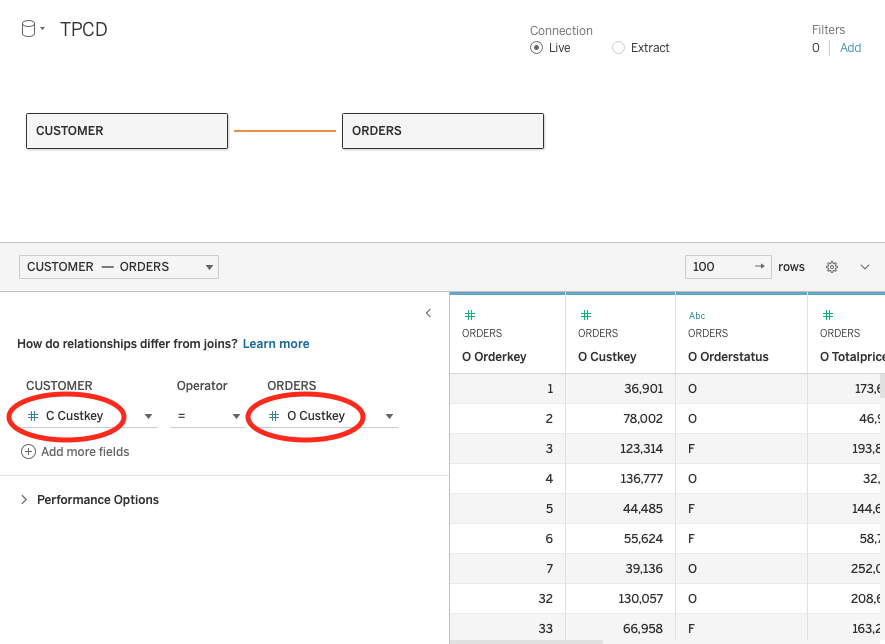
Drag the ORDERS table into the workbook, then set Custkey as the relationship field between the two tables:
-
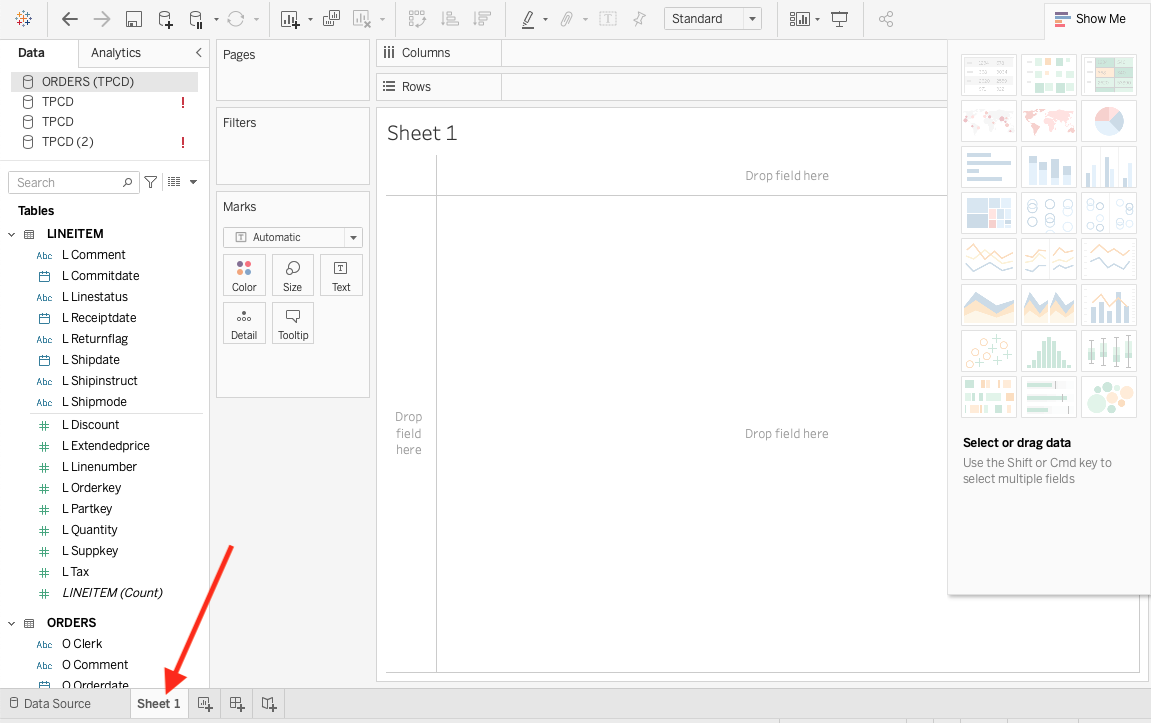
You now have the ORDERS and LINEITEM tables associated with each other as your data source, so you can use this relationship to answer questions about the data. Select the Sheet 1 tab at the bottom of the workbook.
-
Suppose you want to know how many specific items were ordered each year. Drag OrderDate from ORDERS into the Columns section (the horizontal field), then drag Quantity from LINEITEM into the Rows. Tableau will generate the following line chart:
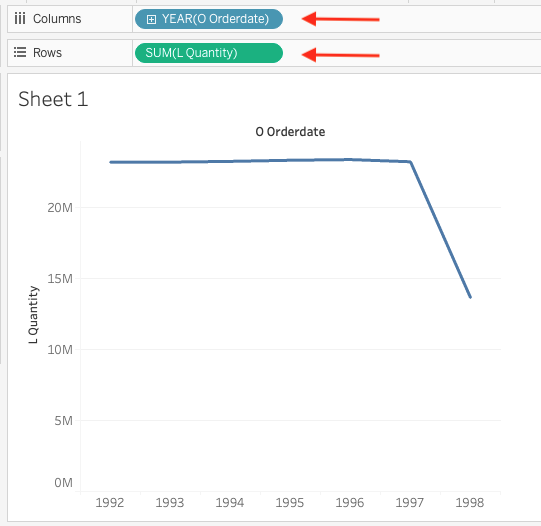
Not a very exciting line chart, but the dataset was generated by a script and built for testing query performance, so you will notice there is not a lot of variations in the simulated orders of the TCPD data.
-
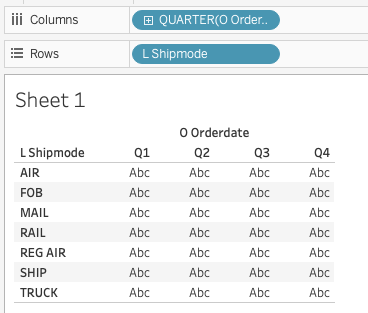
Suppose you want to know the average order amount (in dollars) by quarter and also by shipping mode (air, mail, ship, truck, etc.):
- Click the New Worksheet tab create a new sheet
- Drag OrderDate from ORDERS into Columns and change it from Year to Quarter
- Drag Shipmode from LINEITEM into Rows
You should see the following:
-
The Abc values are just filling in the space until you drag a metric onto the table. Drag Totalprice from * ORDERS* onto the table. Notice the default calculation is to SUM the Totalprices:
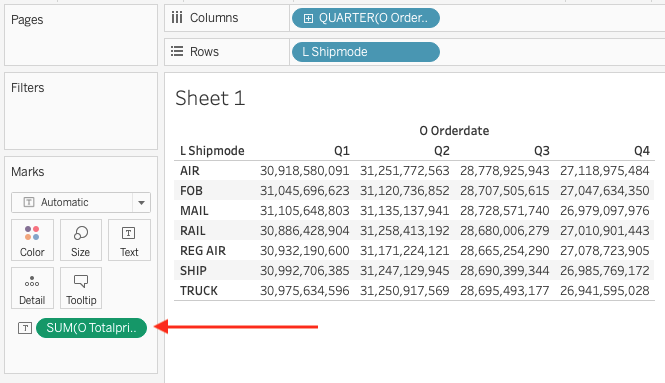
-
Click on SUM and change the Measure to Average. From the same dropdown menu, select Format change the Numbers to Currency (Standard):
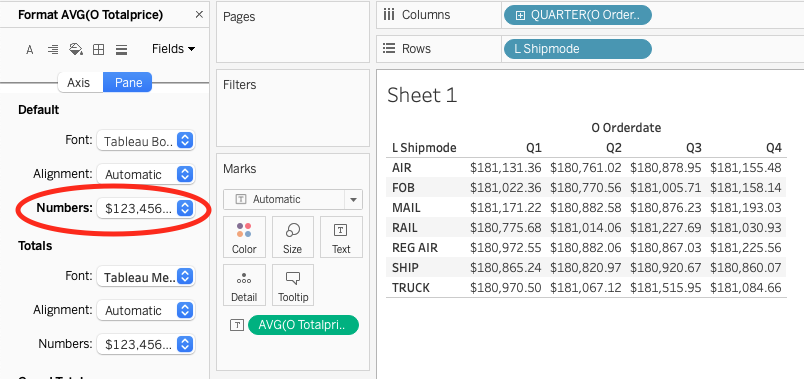
Well done! You have successfully connected Tableau to ClickHouse, and you have opened up a whole world of possibilities for analyzing and visualizing your ClickHouse data.
Install the Connector Manually
In case you use an outdated Tableau Desktop version that doesn't include the connector by default, you can install it manually by following these steps:
- Download the latest taco file from Tableau Exchange
- Place the taco file in
- macOS:
~/Documents/My Tableau Repository/Connectors - Windows:
C:\Users\[Windows User]\Documents\My Tableau Repository\Connectors
- macOS:
- Restart Tableau Desktop, if your setup went successfully, you will set the connector under the
New Data Sourcesection.
Connection and Analysis Tips
For more guidance on optimizing your Tableau-ClickHouse integration, please visit Connection Tips and Analysis Tips.
Tests
The connector is being tested with the TDVT framework and currently maintains a 97% coverage ratio.
Summary
You can connect Tableau to ClickHouse using the generic ODBC/JDBC ClickHouse driver. However, this connector streamlines the connection setup process. If you have any issues with the connector, feel free to reach out on GitHub.

